Fall is the time for canning. Canning supplies are flying off the shelves and women (mainly women, though I am sure there are some men out there somewhere) are hidden away indoors canning and preserving everything in sight from apples and peaches to tomatoes and jerky. Preserving includes canning, dehydrating, and freezing. If you decide to, you can get really creative with what and how you preserve food to be put up for the winter. Almost everyone in this neck of the woods we now call home has an amazing garden. It is commonplace to see people growing all their own fruits and veggies including corn, squash, tomatoes, beans, lettuce, broccoli, raspberries, strawberries, apples, pears, peaches, plums, blackberries, cantaloupe...you name, around here, people can grow it AND can it!
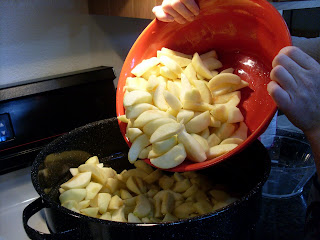
After my canning lesson, I got all my supplies, started picking apples, and set out to do my own canning. For my first attempt, I decided just to preserve the apples (fruit with syrup), so I could use them for almost anything at a later date. This "recipe" proved to be more difficult than it appeared, mainly because it called for so many POUNDS of apples instead of cups, etc. and it didn't state if those pounds were whole apples or cored and peeled apples. I figured since it didn't specifically state peeled and cored apples, that I should bet on whole apples. I got out the scales and weighed everything, and still ended up with an immense amount of apples. I had to use the canning pot just to boil them the recommended time before beginning the canning and processing....you can imagine how hard it was to bring all those apples to a boiling point and then keep them there for only 5 minutes. It was a challenge to say the least. Once they were boiled, I got my heated jars and began filling them with the apples and syrup. They packed down quite a bit and I had to keep adding more apples and syrup to each jar, all the time worrying the jars were getting too cool. Then, I ended up needing more jars than the recipe called for...apparently, in spite of what the Ball Blue Book of Canning says, it is not an exact science. So, I had to get a couple more jars out and fill those, still worried the others I already filled were cooling too much. Anyhow, I managed to get all the jars filled with apples and syrup, wiped clean, lids put on, and ready for the canner. I was so thankful that my mother-in-law was there for my first canning attempt...she was a huge help and gave me some great ideas to iron out some of the wrinkles we ran into. We finally managed to get the jars into the canner and processed....I have already used several for pies and they were excellent. The jars sealed in a snap once out of the canner. What a learning experience!
Since that first day of canning, my friend K and I have made all sorts of stuff...apple butter, tart applesauce, sweet applesauce, apple preserves, more canned apples, and apple pies. All have turned out nicely and we still have more apples to put away. I also want to try to make some salsa before winter. As for the stuff we made with our lovely "canning teacher", D, I have tried some of the peach salsa on chicken and rice AND on a delicious blue cheese burger....both were AWESOME!! I like having the time to get a little creative with our meals and use fresh, homemade ingredients...although David would probably say I still rely on canned and frozen stuff more than I use the fresh stuff. :) Hope you like apples for Christmas!

Apples going in to boil

Filling jars for processing

Filling and packing jars

Cleaning jars and putting seals and rims on before processing

Putting apple jars in canner to process

The finished product...yummy apples for anything you want to make!

Making apple butter

Apple butter cooking

Apple butter

My first homemade apple pie...apple cranberry pie to be exact. YUMMY!


